
Create an Orchestral Template in 10 Steps (+ Checklist)
A huge time-saver for many.
For many composers, an orchestral template is the best thing since sliced bread.
This chapter covers the steps, techniques, and thought processes behind building an orchestral template. The concepts are the same for each DAW, whether you use Cubase, Logic, Studio One or Reaper.
Why use an orchestral template?
With an orchestral template, you open your DAW and immediately find your favorite sample libraries loaded up and organized.

Imagine this: You have a strings section folder with violin 1, violin 2, viola, celli, and double bass tracks, followed by a brass section folder with your brass instruments. The same goes for the other sections.
Everything is neatly prepared: The libraries are set up the way you want, for example, purged with the internal reverb turned off. All is routed correctly. And the tracks already have the right negative track delay applied.
In short, you fire up your DAW and are ready to go.
In this chapter, we'll go through 10 easy steps to create an orchestral template from scratch.
You can find a handy checklist of the 10 steps included in your Orchestral Music Production Starter Kit.
Haven't grabbed Your Orchestral Music Starter Kit, yet?
Kickstart your composer journey with our best collection of free music production resources.
Includes:
- ❗ Requirements For Beginner Composers
- 🗺️ Music Theory Quick Guide
- ✅ Orchestral Template Checklist
- 📃 Orchestral Instrument Ranges Table
Orchestral templates are helpful when writing an album or working on a project where you're scoring for film, writing production music for TV and trailers, and more.
Especially when writing similar styles of music regularly, one consistent template will save you hours and hours in the long run.
If, for example, Cinematic Studio Strings are your go-to strings, wouldn’t it be wasted time if you had to select, load, and prepare each CSS patch time and time again for every new song?
Templates are great because they do this for yourself, giving you a solid foundation. You can create variations of your template to fit different projects. Perhaps your epic template can eliminate the woodwinds and world instrument section and add a trailer effects folder instead. You can then switch templates based on the needs of your project.
There’s another benefit to building a template as a beginner.
By creating tracks, folders, buses, and organizing and routing them, you’ll get good practice in navigating your DAW in a way that works for you.
Of course you can also use templates that are not created by yourself. I bought two orchestral templates for my DAW Studio One when I started my composer journey.
But - to be entirely honest - I never used them.
It felt like working in someone else’s environment. Like entering a stranger’s home and trying to find the toilet (in the dark!). Instead, I spent a few days diving into the ins and outs of Studio One and made one myself. Youtube tutorials, composer community groups, and a good portion of trial and error finally made it click.
After several projects full of clicking in the wrong places and being lost in menus and dialog windows, for the first time, I felt in control.
That feeling of general cluelessness had finally vanished. It was so worth it.
Because I made that experience earlier on my composer journey, I am convinced now that building your template from scratch is fantastic. No matter if you’ll end up using it a lot or not.
However: Don’t feel forced to use a template just because many composers do. Instead, try to constantly evaluate your workflows and find shortcuts to accelerate your most frequently used actions inside the DAW. Find out yourself if a template helps you achieve this, or if you can find a better way.
One example that works for me very well is creating modular blocks of track presets that I can drag into my project as I need them.
Template structure
Your template is your home. And unlike me using someone else’s template in the beginning, you’ll know where the toilet is.
I’m not saying these are the correct way of doing things. Take it with a grain of salt and tailor things to your preference and workflow. You might even get ideas from using foreign templates for your own.
First, here's how I structure my orchestral template in the big picture:
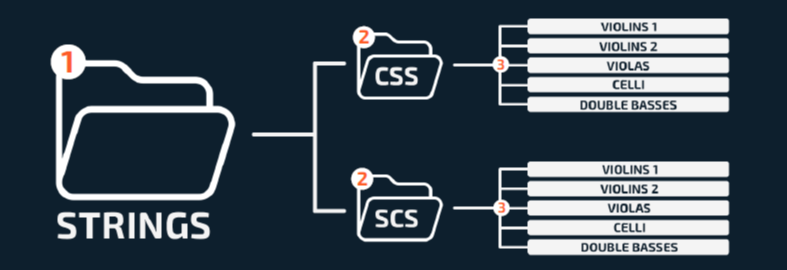
- The instrument sections are on the highest hierarchy level: Strings, Brass, Woodwinds, Percussion, etc.
- To each of these, we’ll add subfolders of sample libraries: Cinematic Studio Strings, Berlin Strings, Pacific Ensemble Strings, etc.
- And in each of those library folders, we’ll place the instrument patches we want: Violins 1, Violins 2, Violas, Cellos, Basses, etc.
Organizing folders by sample library makes it easy for us to hide and deactivate library folders that we won’t need for a specific project. This helps us get a better overview of our project.
Tip: You can also do it the other way round: First the instrument groups (Strings, Brass…), then instrument folders (e.g. Violin 1, Violin 2,...) and inside each of those instrument folders the respective sample library patches (Violin 1 CSS, Violin 1 Berlin Strings, Violin 1 Pacific Strings).

Here are some of my personal preferences regarding orchestral templates and DAW workflows. Some of these spark rather hot debates among composers :)
Find a workflow in your DAW that works fast and reliable for you.
My findings are based on years of deliberate work, mistakes, trial and error, and ultimately: improvement. Feel free to get inspired and try adopting them to your own routine when composing.
Multi vs. single patches
I prefer using multi-patches (all articulations in one patch) over individual single-instrument patches (e.g. only staccato articulation).
That way, I can switch articulations quickly and on the fly, using either keyswitches or - much more convenient - Studio One's Sound Variations/Cubase's Expression Maps or other articulation mapping features.
Kontakt routing

Some people add multiple instruments into the same Kontakt instance and use the MIDI channel to route them to several tracks in your template.
Honestly, this is too complicated for me.
I add only one instrument patch per Kontakt instance to save myself routing trouble with multiple Kontakt output channels. It doesn’t seem much more taxing on the CPU and feels more intuitive to me. I want to go for simplicity here.
Purging
If my computer has less than 64GB of RAM, I will purge all Kontakt instances in my template to save RAM and have a clean and lightweight start. If I have 64GB or more I don’t bother purging, because my system can load everything.
Reverb: Inserts vs. sends
 You can add your reverb plugin as an insert effect directly on the tracks (or a folder bus) you want to apply it to, and set it according to the desired effect.
Alternatively, you can create an effects channel with your reverb set to 100%, then route all your instrument tracks to the channel with different signal strengths.
That way, you can achieve different amounts of reverb for each instrument or section with only one reverb insert for your CPU to process.
I use one reverb insert effect for each instrument section, sometimes even just one reverb plugin on the master fader that applies to the entire project.
One reverb insert per orchestral section (strings, brass, etc.) still gives enough fine control to reach the sound of a pro-level virtual orchestra. I guess I just don’t like routing things.
Focusing on simplicity and modularity, let’s build our template.
Build your template in 10 simple steps
Disclaimer: This process gets a bit technical, but it's something you need to I documented the step-by-step process in a 5-minute video tutorial, which will be easier to follow.
In any case, here's the written explanation with screenshots. I use Studio One, and it will work similarly with other DAWs.
When building our orchestral template, we’ll work backward from sample library patch (e.g. Violin 1) to sample library subfolder (e.g. Cinematic Studio Strings) to instrument section folder (e.g. Strings).
1. Create a new project.

2. Add Kontakt instances. Let’s start with the strings section.
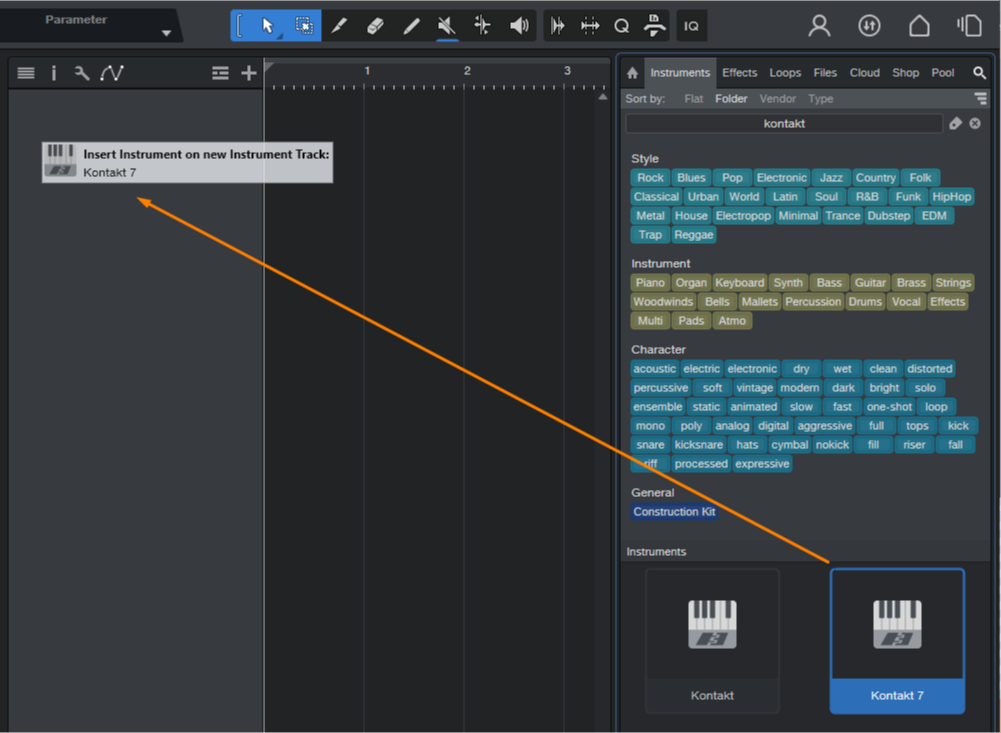
3. Select the sample library patches you want and load them into each Kontakt instance. Ensure that each Kontakt instance's internal reverb is turned off if you plan to use an external reverb plugin. Purge all instruments if your computer has less than 64GB of RAM to be on the safe side when loading up your template.

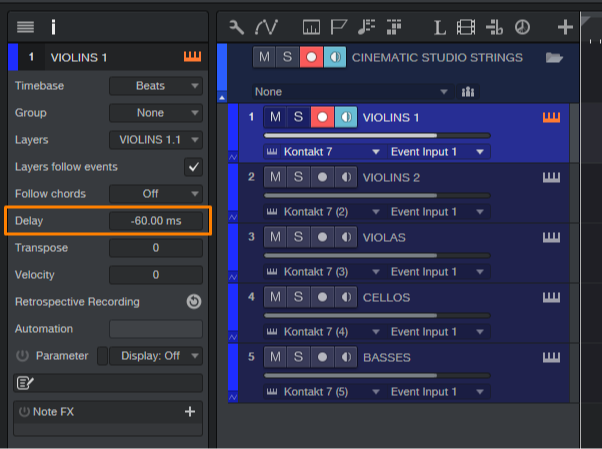
 4. Name the tracks (e.g. VIOLINS 1, VIOLINS 2, VIOLAS, etc.) and pack them into a folder. 5. Name the folder according to your library (e.g. CINEMATIC STUDIO STRINGS). 6. Set the negative track delay for each track according to the sample delay of your library. I’d pick -60ms for CSS because that’s the sample delay for its shorts articulations. The legato timings I will manually adjust when recording melodies.
 7. (optional): If you have them, you can apply Expression maps (Cubase) or Sound Variations (Studio One) to each patch for quick articulation switching.
I purchased Babylonwaves Art Conductor that comes with thousands of these pre-mapped articulation switches. In the beginning, I hesitated if it's worth the ca. $100 Dollar investment.
But I quickly understood: For me, there's no turning back!
It's just so nice not having to worry about keyswitching.
I mapped the most important articulations to a button on my Stream Deck, and can switch articulations pretty much seamlessly.
Tip: With s1toolbox.com by Lukas Ruschitzka, you can convert Cubase Expression Maps into Studio One Sound Variations with one click. For free.
Now we have a library folder (in our case Cinematic Studio Strings) within our Strings folder that has all patches prepared with no internal reverb, purged RAM, a negative track delay, and active Sound Variations.
If you have another strings library, you can do the same drill. Prepare the patches in the way you like them, don’t forget to set the correct negative track delay and pack them in a folder.
You now have two strings library folders inside the strings folder. Each contains patches for violins, violas, cellos, and basses. Depending on your next project, you can hide the strings library folder you don’t want to use.
 8. Once you have all strings patches prepared and organized, select them and add a bus channel. Place your reverb as an insert on this bus channel. It will now be applied to all patches inside the Strings folder.
For me, one reverb per section (strings, brass, etc.) is enough, and - IF I wanted - I could still make fine adjustments on an individual patch level or add one reverb bus per library. But for now, I won’t.

9. Repeat the same steps for the Brass section, Woodwinds, Percussion, Vocals, Sound Design, and whatever you want to add to your template. And at the end, it will look something like this.

You can open, close, and hide folders and immediately access all your instruments.
With Expression Maps (Cubase) or Sound Variations (Studio One), you can switch between articulations in the same patch and even assign them to buttons on your keyboard. Good preparation pays off here.
10. Lastly, add a simple mastering chain if you have plugins for that already.
A mastering compressor (e.g. Shadow Hills Mastering Compressor) and limiter would be great here.
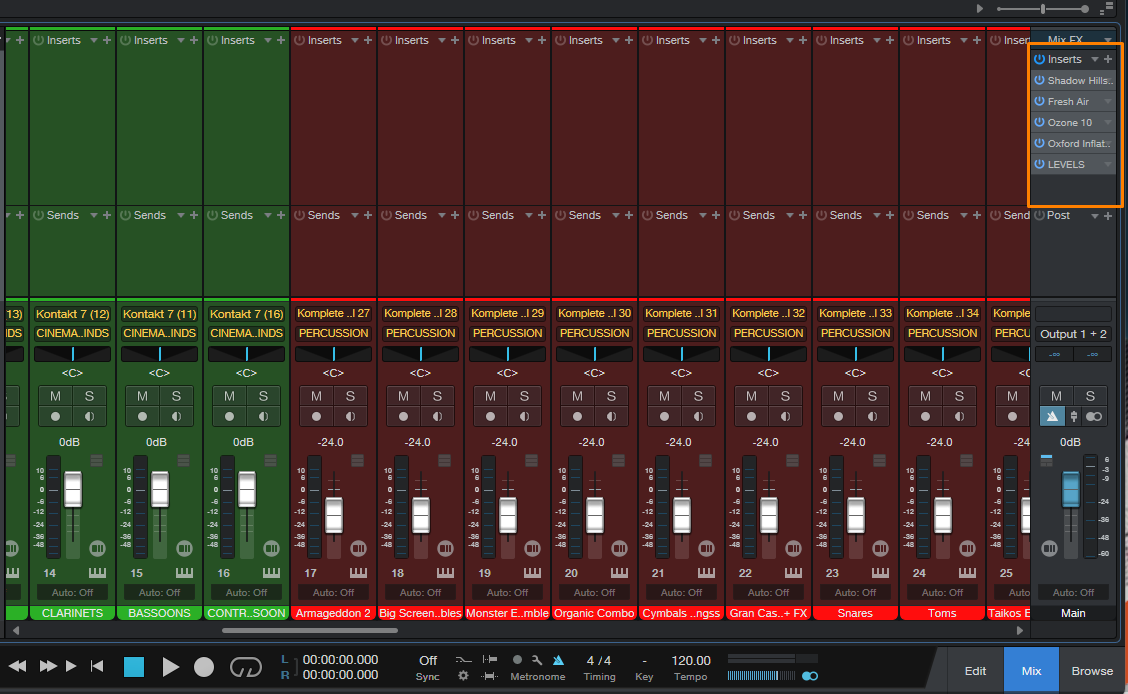
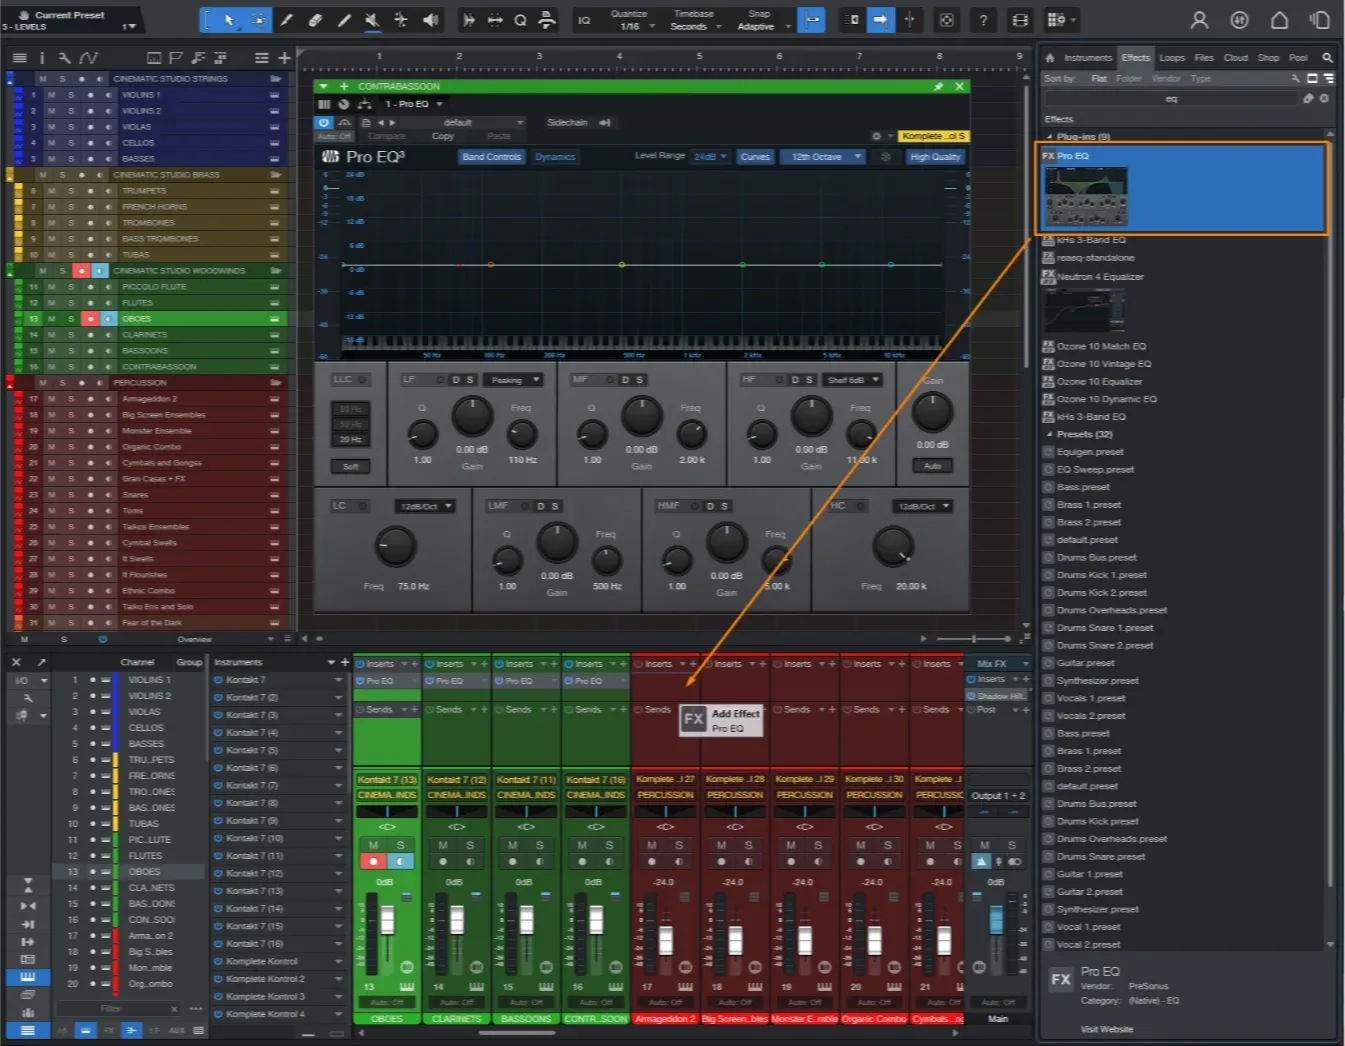
If you wanted, you could add EQ inserts to instruments that you wish to adjust in their sound frequencies. For example, if you don’t like the warm tone of your CSS violins, you might already add brightness to them as part of the template.
Personally, I’d do this later on in the mixing and mastering stage.
You now got the main framework for your new template by focusing on simplicity and modularity. You can easily add library folders to your instrument group buses or add entirely new groups to the template, like synths or world instruments.
With our orchestral template set up, let’s go write some music!
Learn more

Chapter 5
Orchestral Sample Libraries
Discover the best orchestral sample libraries for beginners and how to use them.

Chapter 7
How To Write Orchestral Music In 5 Steps
Create a motif, build your melody, and bring the music to life. Time to start writing our first track!
