
Digital Audio Workstation (DAW)
Your musical workplace.
In this chapter, we'll cover the basics of getting started with composing in a Digital Audio Workstation (DAW) from the perspective of an orchestral composer.
What is a DAW?
A Digital Audio Workstation (DAW) is a type of software that allows you to record, edit and mix music.
Composers use DAWs to create musical compositions using virtual instruments and MIDI controllers. With orchestral sample libraries, this usually happens in the MIDI file format.
DAWs are used by professional and amateur musicians alike. DAWs have come a long way since they were first introduced in the 1980s. Modern workstations can do anything from recording live instruments to producing professional-sounding songs with ease.
The best part about using a DAW is that it gives you total control over every aspect of your music production process. You can record audio, add effects, and mix multiple tracks within one application!
The most common DAWs for writing orchestral music are Cubase, Logic Pro (Mac only), Studio One, and Reaper.
Tip: A DAW doesn't produce music by itself. It's your work environment. Your DAW is like a canvas: A space for you to use your tools on and create a composition.
Which DAW should I choose?
Beginners often wonder what's the best DAW for them. The short answer is: That depends on the type of music you're making. Different DAWs are better suited to different kinds of music.

If you're an electronic music producer, you might want to try Ableton Live or Logic Pro X. If you're a hip-hop producer, then FL Studio might be the best option for you.
It's safe to say that Cubase is the most used DAW by professionals, and it's often considered the best DAW for orchestral music. Hans Zimmer has been using Cubase for decades.
Personally, I use Studio One for its straightforward interface, simple drag-and-drop workflow and a lot of Cubase-like functionality for orchestral music.
You must find the DAW that fits your workflow.
You need to be able to create music quickly and efficiently without getting distracted by features you don't really need. This was my main reason for choosing Studio One over Cubase. But that may change.
For each of the DAWs listed above, I know of at least 1 professional composer who creates orchestral music with it.
The main thing to remember is that there is no best DAW.
Composers argue about this daily. Some people will say that one type of software is better, but that's only true in how it benefits them personally. I think they'd better use the time to write awe-inspiring music rather than debating all day.
DAWs are a lot like operating systems, with some DAWs being better for certain types of music than others. It all depends on the task you want to achieve. Most DAWs do the same thing; they just do it in different ways, and the best DAW is the one you're most comfortable using.
Your music sounds the same in every DAW. But some have better workflows for orchestral music than others.
You should also consider how much money you want to spend on software and how long it will take you to learn how to use it. Have an eye on sales to buy your DAW of choice at a discounted price.
Most DAWs come with free trial versions, so do your research, ask around and most importantly: Try them out yourself!
Not sure which DAW is best for you? Let the Become A Pro Composer community help you out!
How to use a DAW
Let's dive into the basic steps of how to use a DAW.
Each DAW comes with a comprehensive manual you should refer to when stuck. But let's be honest. Those manuals are often huge and daunting, with tons of information crammed into one PDF. Cubase Pro 12’s manual has 1391 pages!
That's why I'll now explain the essential workflows of how you will use your DAW to create orchestral music step by step. In simple words!
We'll focus on the basics that all DAWs share. No matter which DAW you choose to try, the following paragraphs help you understand the general concepts of how orchestral composing works on a computer.
I'll use Studio One as an example for the screenshots.
Select your audio interface in the driver settings
Making sure you hear things is the first step you should take with any DAW on the first startup. Your speakers or headphones need to be connected to your audio interface, which is connected to your computer.
To hear it, select the correct audio device. Usually, you'll want to choose the driver with the name of your audio interface (e.g. Focusrite USB in my case).
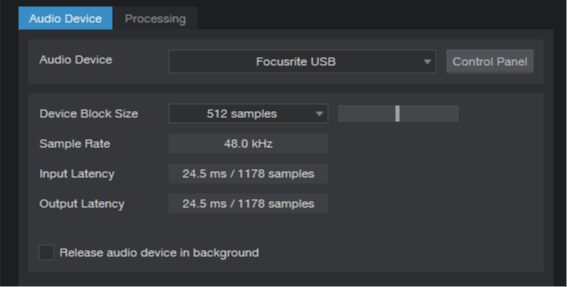
Tip: Double-check the Audio Device settings if you don't have sound in your DAW. Does the driver name correspond to your audio interface?
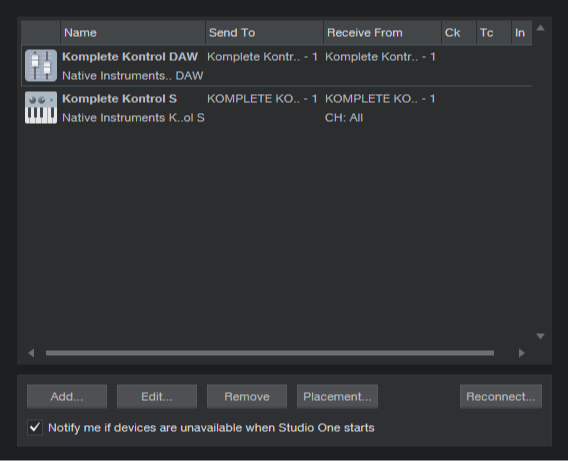
Connect any MIDI controller or external devices in the hardware section
You have to make sure your DAW correctly detects your MIDI controllers. Some MIDI keyboards come with installable drivers that help the DAW recognize them. Others you have to add yourself to the DAW settings.
Usually, these settings are called External devices or MIDI Devices. The website or manual of your MIDI controller manufacturer should explain how to set up your MIDI controller for each DAW (example).
Start writing music
It's finally here: The moment where we create our own music. Create a new project, give it a name and choose tempo and time signature. You can change these values later on.
You're now seeing your main work environment. All of your music will be created here, so you better get familiar with the sight.
Here are some of the essential steps you’ll do every time when writing music.
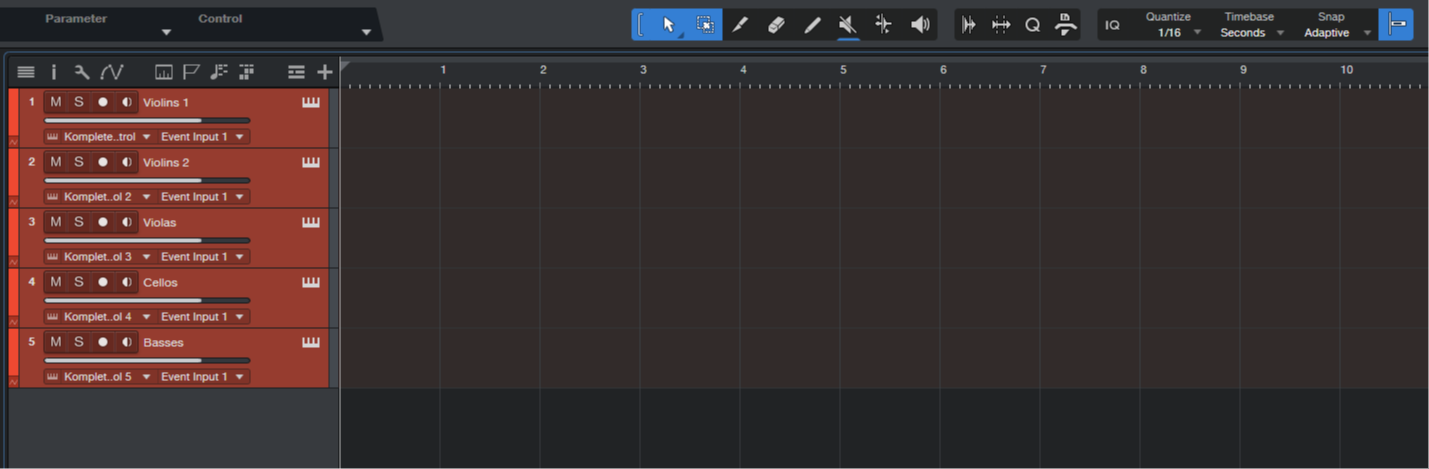
Adding tracks
The first thing you'll do in every project is add tracks.
A track holds the musical information, and usually, you'll use one instrument per track. One track may have the violins, another the violas. One more track for the cello and one for the basses. Et voilá. You got yourself a placeholder for a virtual strings section.
Tracks are the fundamental building blocks of a digital audio workstation. A track contains all the information about the audio or MIDI you recorded, including volume levels, panning, effects settings, and automation data.
A track is usually a single recording with its own channel in a DAW. It contains all the information about the audio or MIDI you recorded, including volume levels, left-and-right panning, effects, and how these parameters behave over time (automation).
Example: If you wanted to record an acoustic guitar and a vocal track together, then you would need two separate tracks - one for each instrument. This way, you can, for example, control the volume of the vocals and the processing effects of the guitar separately.
MIDI tracks vs. Audio tracks
Most of the time, you'll work with MIDI tracks, also called Instrument tracks.
MIDI is like sheet music for virtual instruments.
It contains the information on the notes you input, including data such as how hard you pressed it or for how long (see MIDI Editing below). It does not make any sound alone and does not include any information about the instrument.
Therefore, MIDI tracks need a virtual instrument (VST) or sample library loaded. The instrument will then play back the MIDI instructions as you compose them. You can take the same MIDI information and play it with a trumpet, violin, or contrabassoon!
The massive benefit of MIDI is that it's highly editable. You can change each note's parameters like note length or the intensity it's played with.
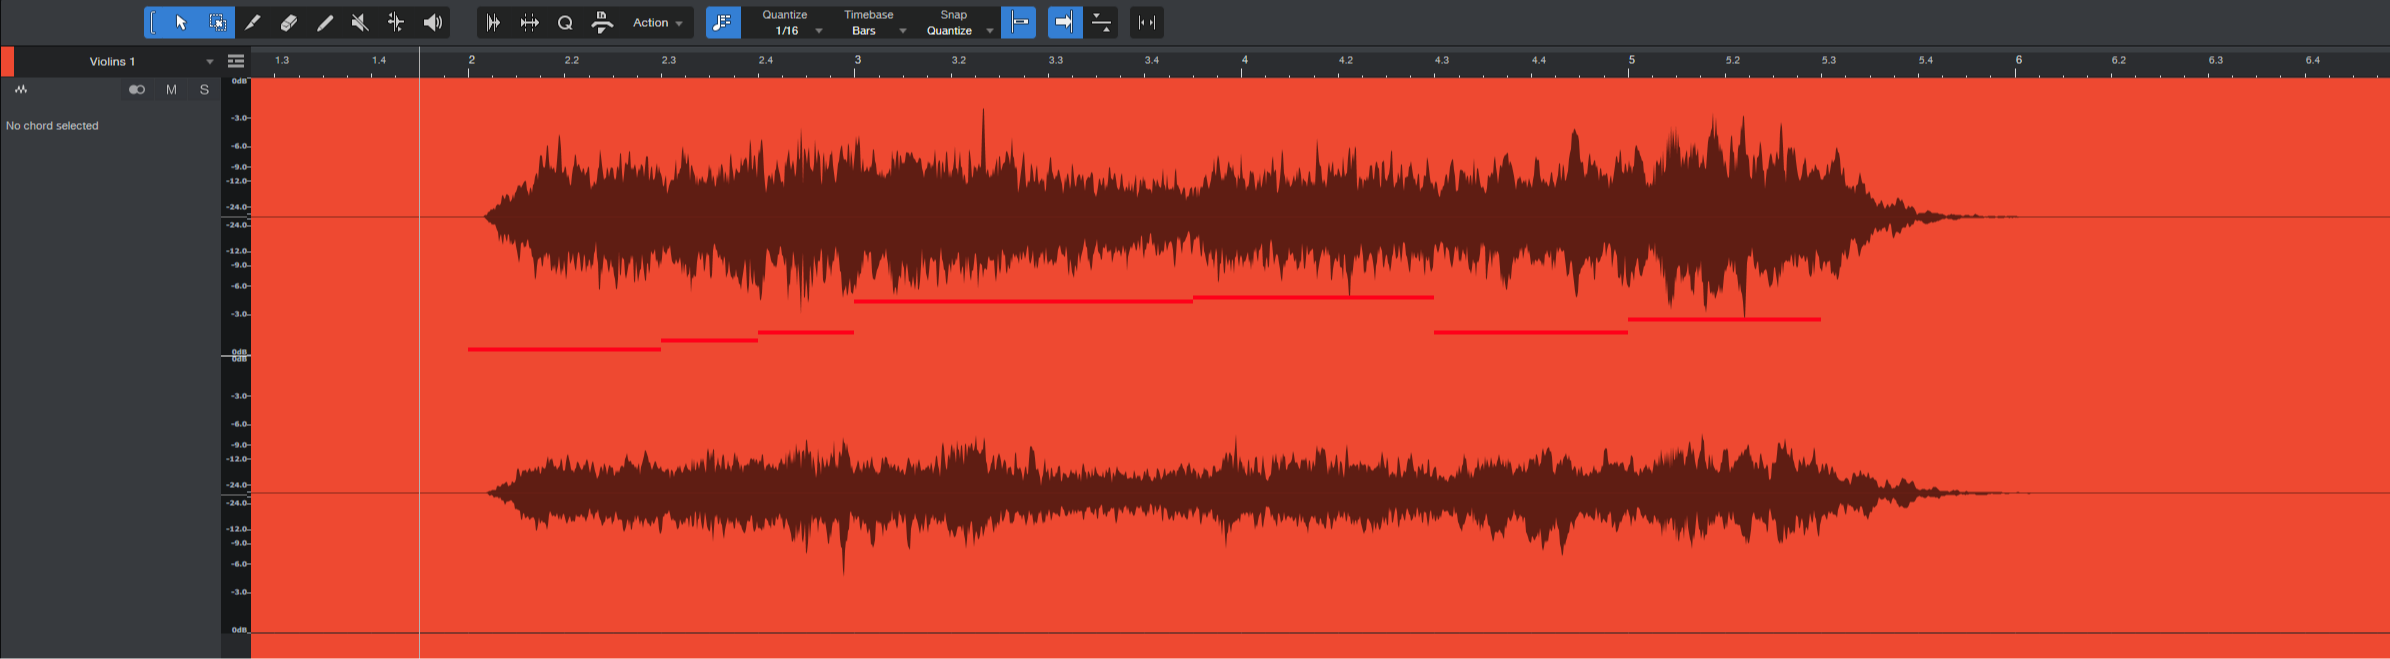
Audio tracks, on the other hand, contain rendered audio clips. They do make a sound. If you drag and drop an .mp3 or .wav file of a song into your DAW, it creates an audio track and shows you its waveform.
There are also many ways to edit audio. Still, it's less flexible than MIDI editing because you don't have access to the individual note as they are baked into the audio file.
PS: Don't confuse the name track in your DAW with the tracks used colloquially when talking about a song ("What a nice track!").
Load sample libraries
For each MIDI track, you must load the virtual instrument you want to use. In orchestral music production, that's usually sample libraries.
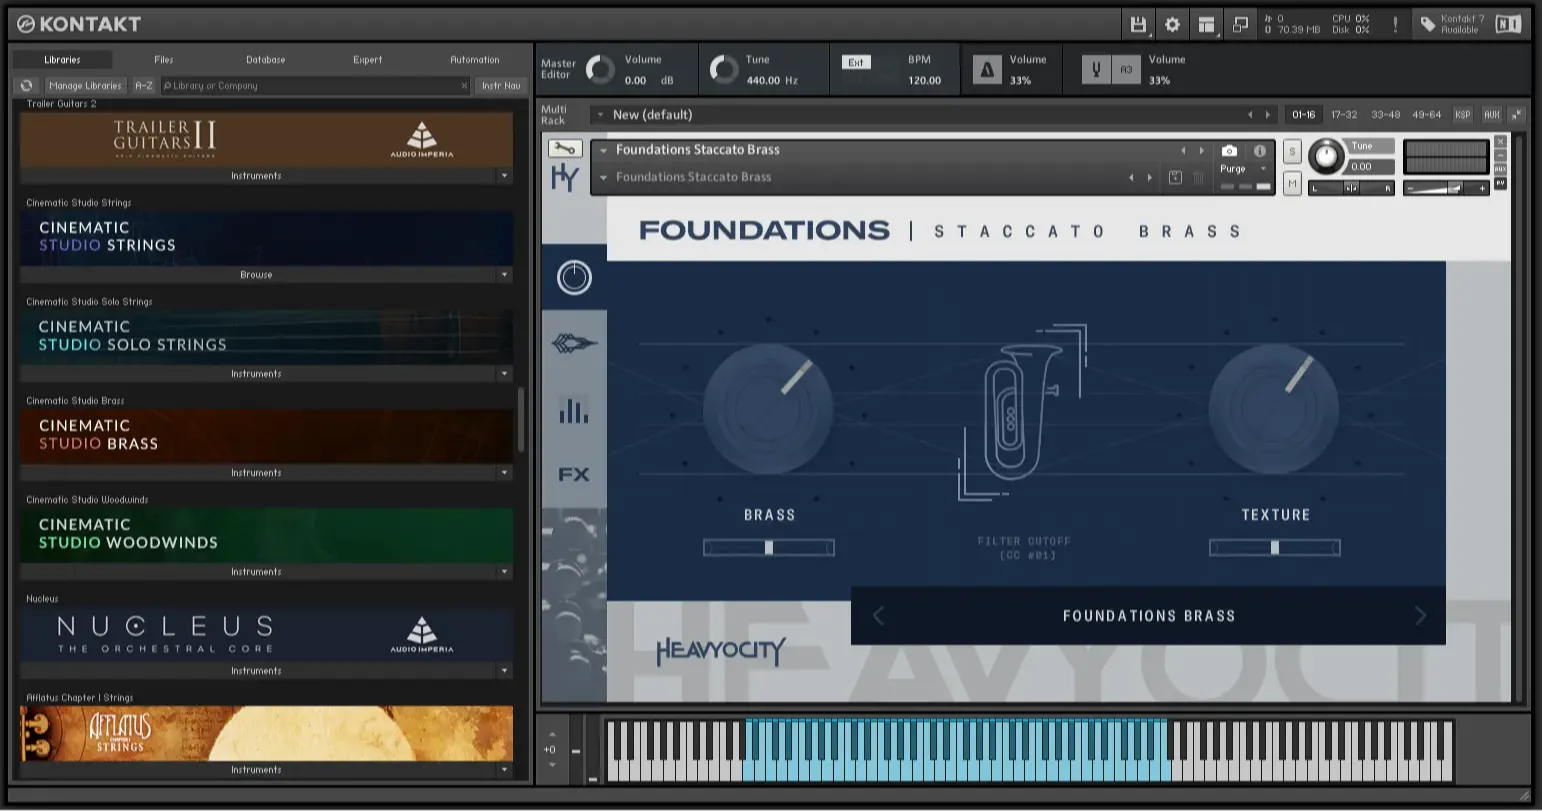
Sample libraries need a sampler to function. Most orchestral libraries run on Kontakt (either the full version or the free Kontakt Player).
So, after adding a track, you load a Kontakt instance (in Studio One simply drag Kontakt from the browser onto the track) and then choose your sample library.
The same goes for SINE Player, Spitfire Audio Player, or other samplers.
Now you should see your sample library's interface and be able to play it.
Instruments that don't need a sampler can immediately be dragged into a track. These are usually referred to as VSTs.
The separation is not 100% clear, as sample libraries are usually considered VSTs (but not vice versa). Don't worry about the naming. Everyone will understand you either way.
Record your melody

There are two popular ways of adding notes to your track. Both are used by professional composers, and there is no right or wrong. Pick the workflow that works best for you.
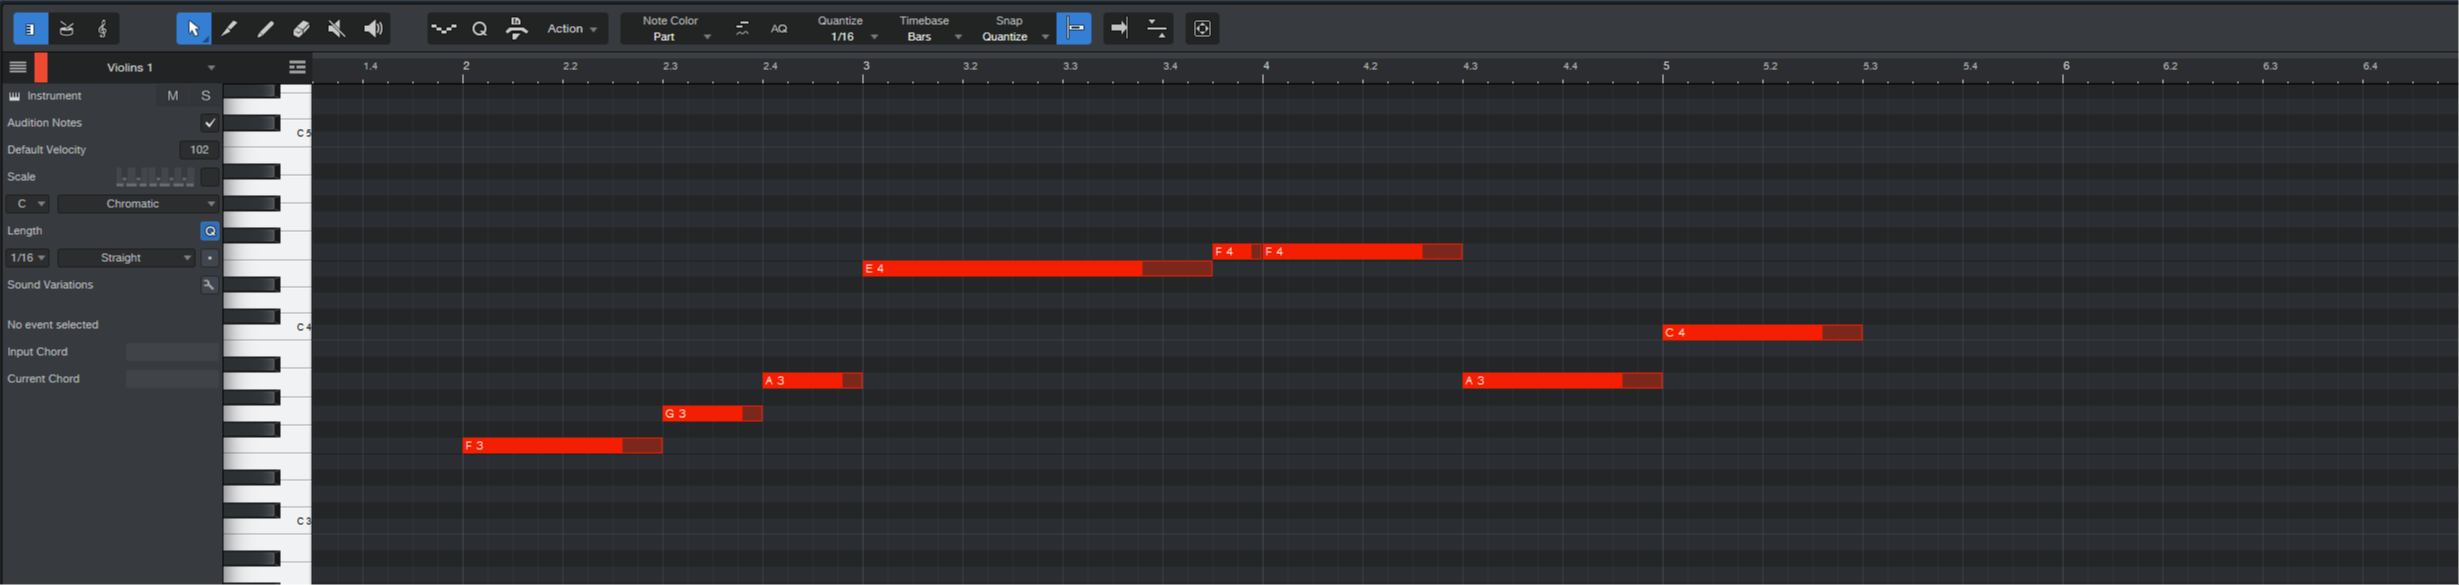
- Program with mouse and keyboard. You can add notes in most DAWs by double-clicking in the MIDI editor. On the left, you'll see the piano roll. It shows which line in the MIDI editor corresponds to which note. You can drag the note ends to change their length and move them around by dragging them in the center. With your mouse, you can copy-paste notes and draw in all the MIDI editing like velocities and dynamics (see below). One benefit is having enough time to think about every note without being rushed by a metronome.
- Record with your MIDI controller. This method comes closer to a live performance. You press the record button and play the melody on your MIDI controller. Activating the metronome helps with timing accuracy. The main benefit is that you can add a human feel to your lines as you play them. Experienced composers can simultaneously play the notes and add dynamics with the mod wheel (see below), which helps them save time. But it may require several takes to get it right. Sometimes it's easier to quickly add a few notes with the mouse and adjust them to taste.
I use both depending on the style and length of the melody.
My favorite way to record is the step record which combines both methods: You play in notes with your MIDI controller. With each pressed note, the MIDI editor goes one position further. Combine this with keyboard shortcuts to change note lengths or use a Stream Deck for some serious workflow magic. You'll enjoy the best of both worlds.
Try both ways of recording and go with what makes you create better results in a shorter amount of time.
MIDI editing

After programming notes with your mouse and keyboard or recording them with a MIDI controller, you'll have to edit them.
These are the most common types of MIDI values you'll adjust when composing orchestral music.
Timing
It's near impossible to record a longer line perfectly in time. You may have input lag in busy projects due to saving CPU power with larger buffer size. Your sample libraries might come with a built-in delay (explained below), and you may not be used to recording with a MIDI controller.
Especially at the beginning of your composer journey, your recorded melodies need a lot of tweaking.
You can move notes back and forth individually or select multiple at once to improve their timings and make them sound on beat. Activate the in-built metronome of your DAW to ensure everything sounds tight and on time.
Changing each note manually results in a lot of work.
That's why you can also do it the quick way by quantizing. Quantize automatically nudges your notes to the grid to make them sound in sync with the beat.


CAREFUL: Quantizing everything to the grid can make your song sound robotic and unnatural, especially when quantizing percussion.
There are two things you can do to counter overquantizing:
- Most DAWs support partial quantization, where you can set a percentage value. It will nudge the notes towards the grid, but only a bit (I like to use 50-75% values).
- Quantize everything to the grid, then use the humanize or randomize feature to add minor timing inconsistencies to the performance (I like to use ±15ms).
As a rule of thumb, your MIDI notes should be tight but not perfectly in time. The musicians in the orchestra aren't, either.
Velocities
Velocity is represented by how hard you press a note on your MIDI controller. It usually affects the intensity of a note.
A low-velocity bass drum may sound soft and smooth. Yet, with increasing velocity, it can turn into a thundering boom.
Editing the velocities is particularly important for setting accentuation in your melodies or rhythm lines. Those notes you want to emphasize need a higher velocity than decorative notes in-between. Like timings, you can also humanize or randomize velocities with most DAWs or use a pen tool to draw patterns.
Dynamics
In orchestral music, dynamics are huge and mainly responsible for an instrument's expressiveness. When playing melodies, musicians adapt to the phrasing. They "feel "the melody. They might get quieter before adding little swells to make the music come to life.
Whereas velocity usually controls the initial force of the beginning of a note (the "attack "), dynamics are responsible for the intensity throughout notes that are held for a longer time.
Dynamics are usually controlled via the mod wheel. Every note would have the same feel if a melody with no dynamics were added. You can add detail and life to the melody line by moving your mod wheel up and down or drawing dynamics patterns with your mouse.
Your music is now performed rather than just playing back.
Set negative track delay
Most orchestral sample libraries have some sort of delay.
This is not a bug or a shortcoming of your library!
Instead, it's intended to achieve a more realistic sound:
Imagine you play a violin and want to perform a nice and smooth melody. You press your finger on a string and use the bow to play the note. For the following note, you need to change your finger position. Either by gliding up or down the same string or by lifting your finger and pressing on another string. Then you bow those notes.
This example shows that two notes never just happen. There is always context between them, some sort of transition. These little slides and scratches are vital for a detailed, convincing sound, even if you haven't consciously noticed them before when listening to orchestral music.
High-quality orchestral sample libraries add these transitions in the so-called legato articulation of the library. So, when playing a melody with two notes on your keyboard, the sample library automatically adds a short bridge between them, causing the second note to sound slightly delayed.
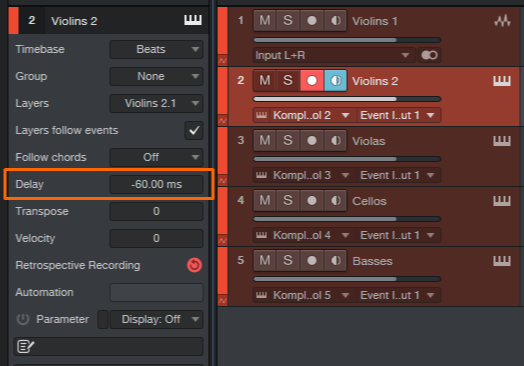
Your DAW can compensate for this delay by playing every note on your track a bit earlier. This is called negative track delay, or delay compensation.
Check the manual of your library to find out its sample delay.
Example: The sample delay of Cinematic Studio Strings' short notes is ca. 60ms. The library will sound slightly delayed if you play a melody perfectly in time. It may not be a big deal, but having these little timing inconsistencies throughout an entire orchestral track makes it sound undefined and washy in total. Set your track to -60ms to fix this. It will now be in time.

Some orchestral libraries - like those from Audio Imperia - have adjustable sample delays:
When recording your melodies, you can set them to 0ms for maximum responsiveness with no audible delay. See the center bottom knob "S. Start" on the right. It's set all the way to the right.
 Once you've finished recording, set the library to 250ms sample delay for maximum realism and compensate it with a -250ms negative track delay in your DAW.
You'll now have it play those realistic legato transitions in time.
By now, you've experimented with adding a track, recording a melody, working on the MIDI editing, and compensating sample delay. But a composition rarely consists of one instrument only, especially not in orchestral music. Depending on your workflow, orchestral tracks often range from somewhere between 15 and 150 tracks!
So, add more tracks to your project and record more melodies, bass lines, and harmonies.
Project organization

As you expand your track count, you'll soon notice a need for organization. Things get chaotic fast.
Name your tracks
Seriously! Initially, it may seem like a hassle, but it's a time-saver later. A messy project is the killer of progress and creativity, as you'll waste lots of time trying to find your instruments. Add the name of every instrument and perhaps the sample library abbreviation to each track.
Example: Violin 1 CSS, Violin 2 CSS, Trumpet 1 CSB, Horns CSB + FS, …
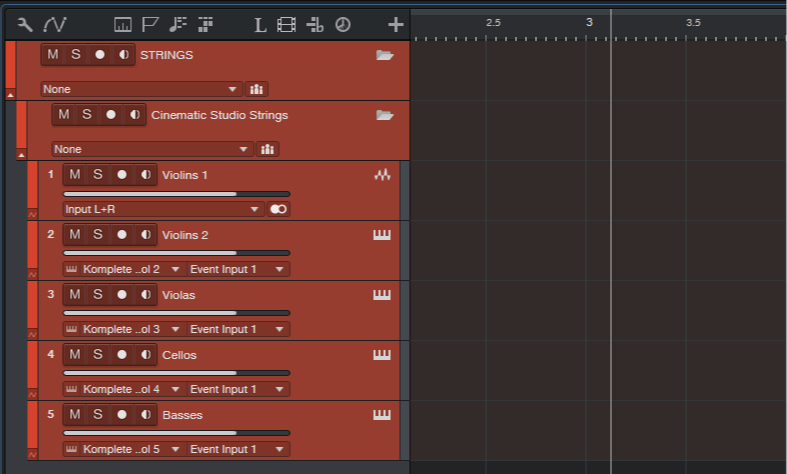
Use folders
Summarizing instrument groups like the orchestral sections into one folder helps with overall project visibility. It opens up a few handy collective editing options.
Select the violins, violas, cellos, and basses, right-click, and you'll see an option to place them in a folder. This should work for all common DAWs. Name the folder STRINGS. You can now mute and solo, show and hide all of your string instruments with one click. This keeps your project tidy, and you can focus on the section you're currently working on.
Organizing sections into folders also opens up the possibility of creating macros that will - for example - hide all instruments except for those in the strings folder. Or only the orchestral instruments but none of the synths and sound design. You get the point!
Mixing and mastering

After creating several music tracks, tweaking them in the MIDI editor, and organizing your project with track names and folders, you'll have to improve the sound quality.
That's what mixing is for.
You'll balance track volumes, pan instruments left and right to fill the space, and add effects to shape and improve the sound with external plugins.
This usually happens in your DAWs mixer, a virtual presentation of those massive mixing consoles you've seen in music production studios. With its many faders and clunky design, the mixer often looks like a place you want to get out of as fast as possible.
But it's actually quite simple.
Move faders for the volume, a slider for left and right panning, and effects slots for adding external plugins. We'll go into this more in-depth in the mixing chapter.
Mastering is the second step in improving the overall sound quality of your piece as a whole. This time, changes are not made separately for each instrument but very broadly on the master channel.
This is the channel that controls the parameters of all your instruments at the same time.
Mastering is also super helpful to ensure multiple tracks of an album have similar overall sound quality. It helps control the overall volume of your composition to ensure it's loud enough and further tweaks the overall soundscape by adding things like compression and equalization.
But more on that later.
Learn your DAW

By now, you should have understood the general concepts of DAWs and how we will write orchestral music using MIDI tracks and sample libraries.
But the process has many details that differ from DAW to DAW. I can't cover these here. But at least I want to give you some tips on how you can learn your DAW efficiently.
Let's face it: Learning a DAW can be hard.
There are so many settings, options, and jargon that it's easy to get lost. Especially in the beginning, the learning curve can initially seem pretty steep—like you're trying to climb Mount Everest in flip-flops.
But there's good news!
Just like any other skill, learning how to use your DAW can be learned with practice and perseverance.
Here are 6 tips that help you learn your DAW of choice:
- Find a YouTube tutorial series for the DAW you're interested in. These are a great way to get started because you can watch at your own pace and focus on the parts that interest you most. Take the time to learn the basics, and don't rush through the tutorials. Here are some helpful tutorial playlists for Studio One, Cubase, Logic Pro and Reaper.
- Read the manual on things you have specific questions about. Then read the entire chapter related to that question. It'll give you a solid foundation of knowledge and understanding when using the DAW in your project. Take notes as you go. These notes will help you remember what you've learned and help you retain the information longer.
- Take some time to explore the interface. Look at what each tool does and see if there's anything that catches your eye. Ask yourself: What is this tool used for? Can I see myself using this tool regularly? Do I understand how it works?
- Ask questions when you need help. The composer community will help you out for sure. Just don't be shy to ask! For more personalized training, consider getting a mentor. Many people out there love sharing their knowledge about DAWs and music production in general.
- Start with small projects! It's easier to learn on something small than something huge, so try doing some smaller projects while learning how everything works together in your DAW.
- Practice makes perfect. The more often you use a piece of software or program, the better you'll get at using it, so make sure to set aside some time every day or week for practicing your skills and honing your craft.
In conclusion, it takes time to learn how to use these DAWs. Be patient with yourself, especially when just starting out.
Don't get frustrated if you feel like you're not making any progress for a while. You'll get there eventually; the more you practice, the better you'll become at using your DAW.
You'll optimize your workflows, use hotkeys and macros, and improve how you write music inside your digital working environment. You got this!
Learn more
Chapter 3
Music Theory Basics For Orchestral Composers
This chapter gets you into music theory in less than 30 minutes. No prior knowledge required.

Chapter 5
Orchestral Sample Libraries
Discover the best orchestral sample libraries for beginners and how to use them.
